Campaign Launch
Step By Step Walkthrough
- Click Campaigns tab > Create Campaign
- Select Conversation
- Click Use Campaign Template to work from a previously created campaign. Otherwise, click Create New Campaign and choose from the list of conversations
- Default Conversations
- PALS - English is a general database reactivation conversation, which is great for reaching out to contacts to build or refresh a basic profile. PALS stands for Position, Availability, Location, and Skills, and the conversation will collect this information and more.
- JobVet - English is a role-specific vetting conversation that will help narrow your candidate pool. If chosen, you will be prompted for basic role information, such as the job title, location, and top required skills. This information will customize the chat to your role.
- Custom Conversations
- Create custom conversations on the Conversations tab
- To leverage a pre-existing conversation, click the Copy button to create and edit a new conversation, or click Add Conversation at the top of the screen to start from scratch
- Contact your Customer Success Manager for assistance with Custom Conversations
- Click the right arrow button (>) to advance
- Set Messages
- Click Message Templates to use a pre-existing template
- Edit SMS message, Email Subject, and Email Body here.
- The SMS body and Email body must contain {widgetlink} so candidates are able to launch the chat
- SMS body best practice: include the {widgetlink} anywhere except the very beginning or end of the SMS, as this sometimes splits the message
- Email body - the RoboRecruiter Link can be plain text or in a hyperlink (best practice)
- See the default JobVet or PALS Messaging Templates for proper examples of this
- Email body best practice:
- Should contain company address to reduce chance of spam flag
- Custom signatures can be copy+pasted into the Email body
- Click the right arrow button (>) to advance
- Select Contacts
- If the contact group is larger than 200 contacts, first click Contacts tab > Verify Emails button
- This will run the email verification testing offline from the campaign, to ensure that the campaign launch is not slowed down
- Use the Filter by: button to filter contacts if desired
- Select contacts individually via the YES/NO toggles, or click the checkbox to select/deselect all contacts
- At least one contact is required to launch a campaign
- Click the right arrow button (>) to advance
- Review
- Add Profile Fields
- Fill these fields to match the particular campaign/role
- JobVet only - top skill 1, 2, 3 are optional fields
- Click Save
- The chosen profile fields populate the previews for SMS, Email subject, Email body, conversation, etc.
- If changes to profile fields are required, click the Review circle in the top green timeline to return to the Add Profile Fields screen
- Final Adjustments
- Left side
- Campaign Name - click the pencil to adjust the campaign name, and then the checkmark to confirm
- Adjust the reply-to email, if desired, to change the recipient of candidate response reports and direct replies to email messages
- Send Email from - do not change (should be SendGrid)
- Send SMS from - do not change (should be Twilio)
- Right side toggle buttons
- Always Send SMS - YES for SMS campaigns
- Always Send Email - YES for Email campaigns
- Send to Safe Emails only - YES
- Send Report to Recruiter
- This feature will send an email to the Reply-to Email address for each candidate that answers 4+ bot questions. This means the Reply-To Email address will receive one email per every candidate that engages. This email will contain a summary of the candidate's responses and is a great way to quickly follow up with engaged candidates.
- To turn this on, toggle YES
- Send Campaign Report
- This feature will send a daily email to the Reply-to Email address with summary statistics of the candidate's performance.
- To turn this on, toggle YES
- Auto Follow-Up
- Toggle NO
- For more information on Auto Follow-Up, contact your Customer Success Manager
- When ready, click Launch Campaign, and Launch again
- You will be taken to the Dashboard tab where you can review campaign results
Viewing Results
- After launching your campaign, you will be redirected to the dashboard
- You can now find your campaign name in the dropdown menu
- Clicking your campaign in the dropdown will populate your results in the graph
- Each bar shows the number of people in each category, such as "Clicked", "Responded" (Answered 1+ questions), and "Engaged" (Answered 4+ questions)
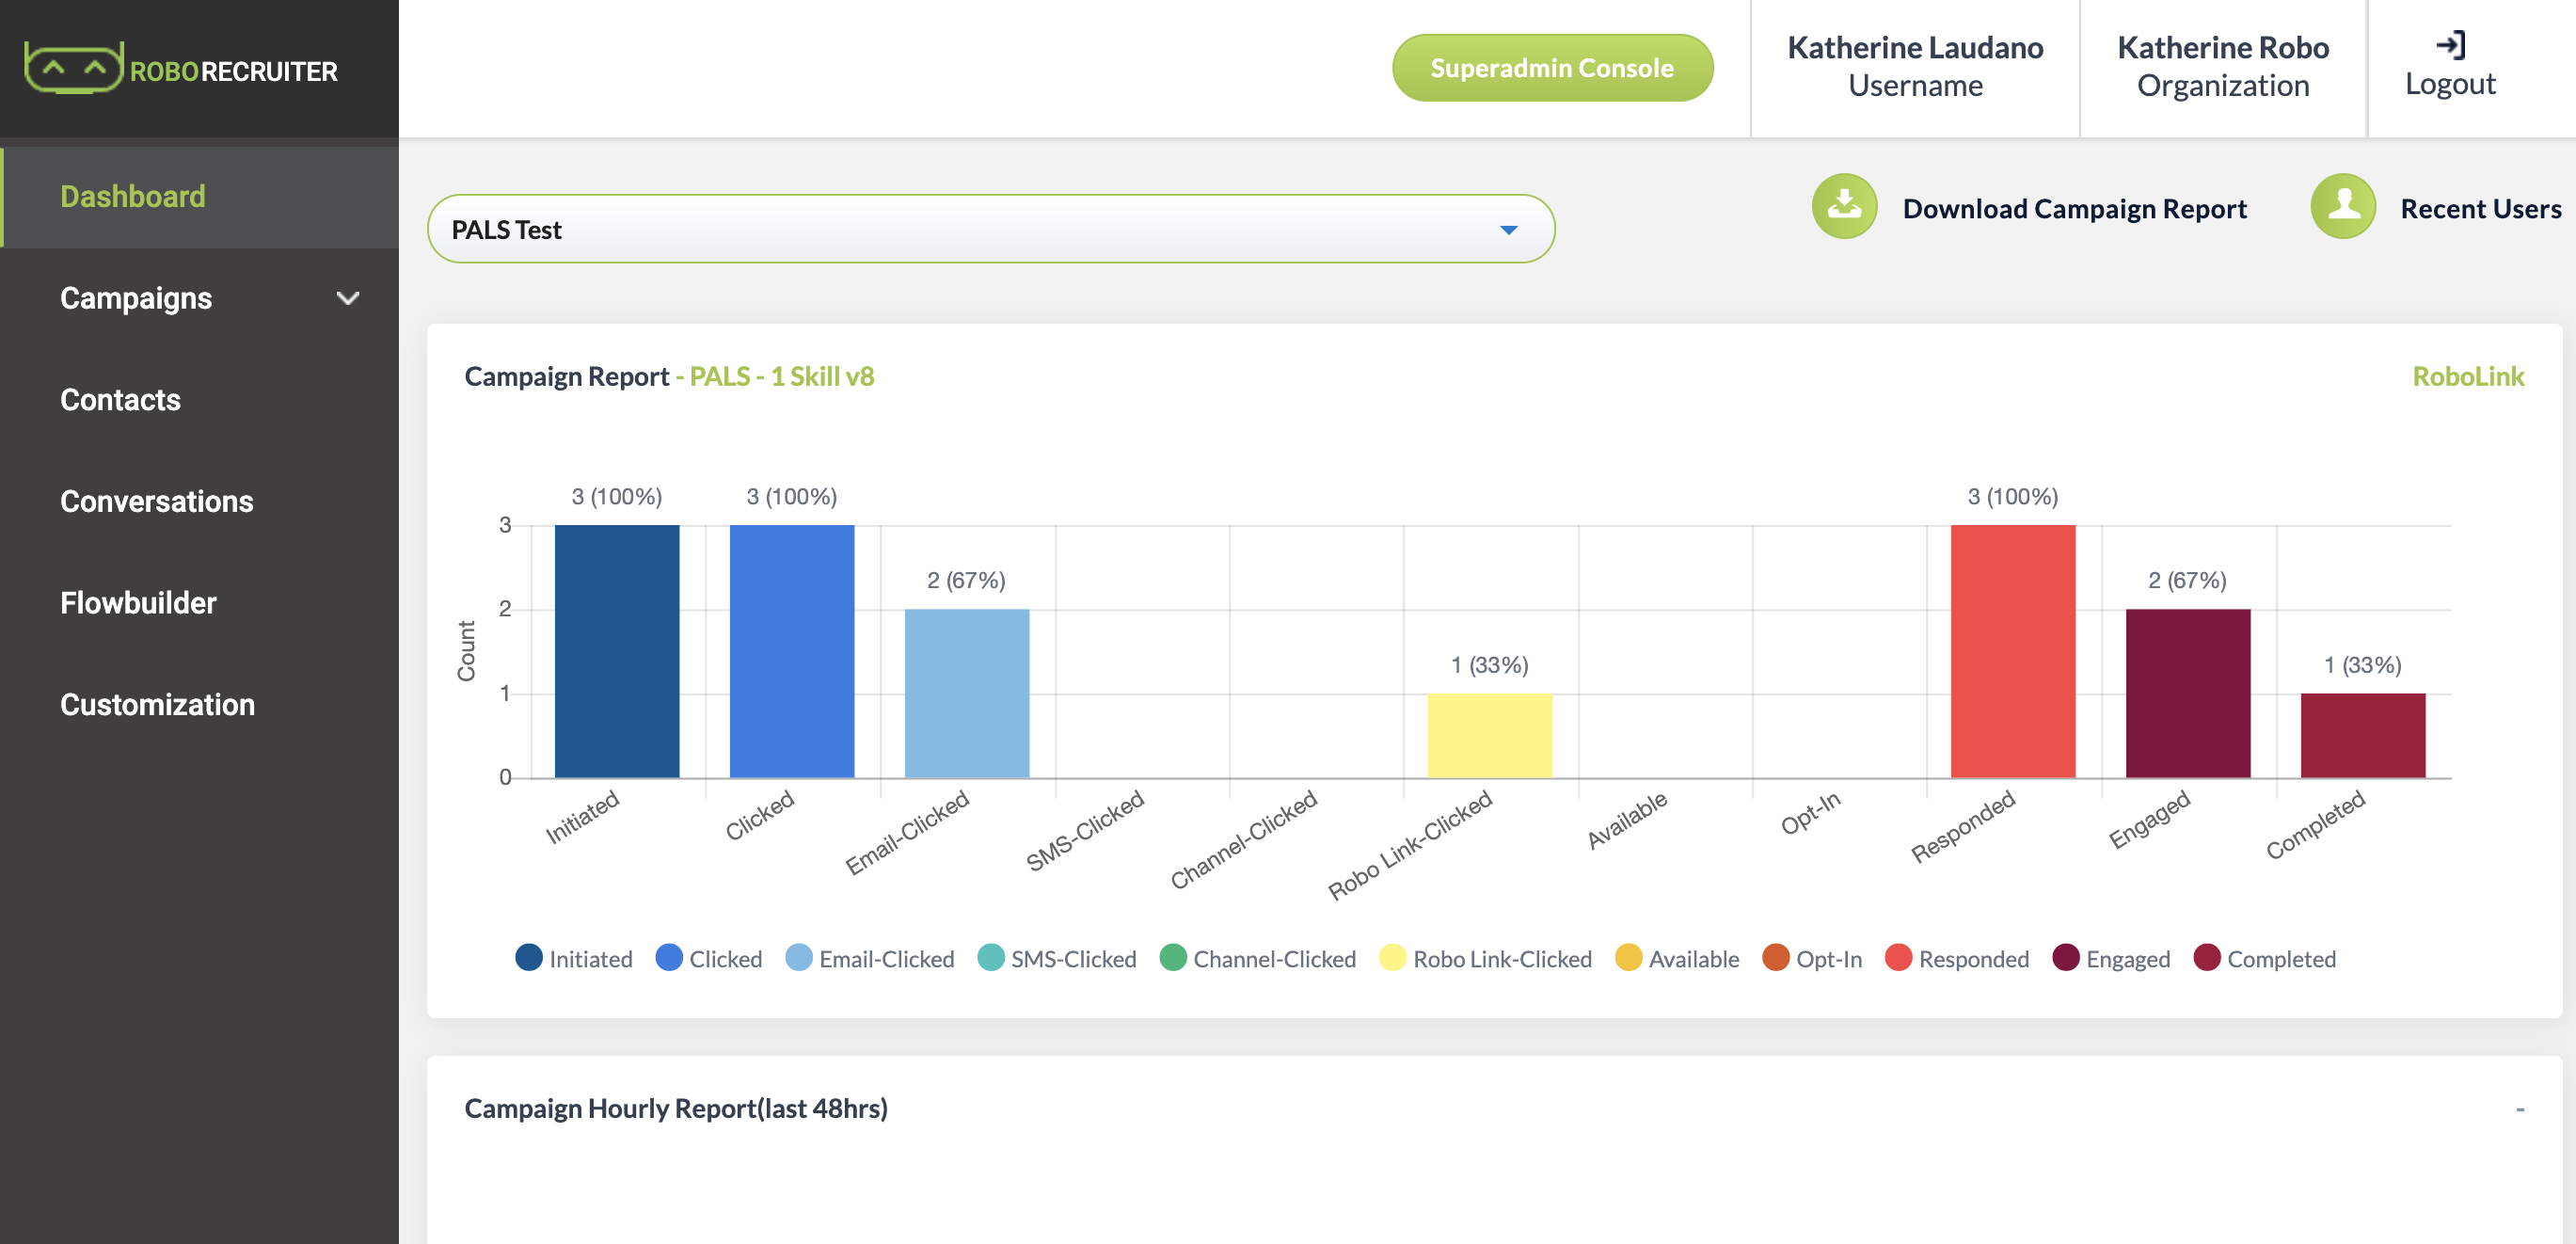
- Initiated bar shows the number of people in the campaign
- Clicked bar shows the number of people clicked on robo link
- Email-Clicked bar shows the number of people clicked on robo link in email
- SMS-Clicked bar shows the number of people clicked on robo link in SMS
- Robo Link-Clicked bar shows the number of people clicked on Robo Link
- Available bar shows the number of people who answered "Yes" on Availability question
- Opt-In bar shows the number of people who answered "Yes" on Opt-In question
- Responded bar shows the number of people who answered 1+ questions
- Engaged bar shows the number of people who answered 4+ questions
- Completed bar shows the number of people who completed the campaign
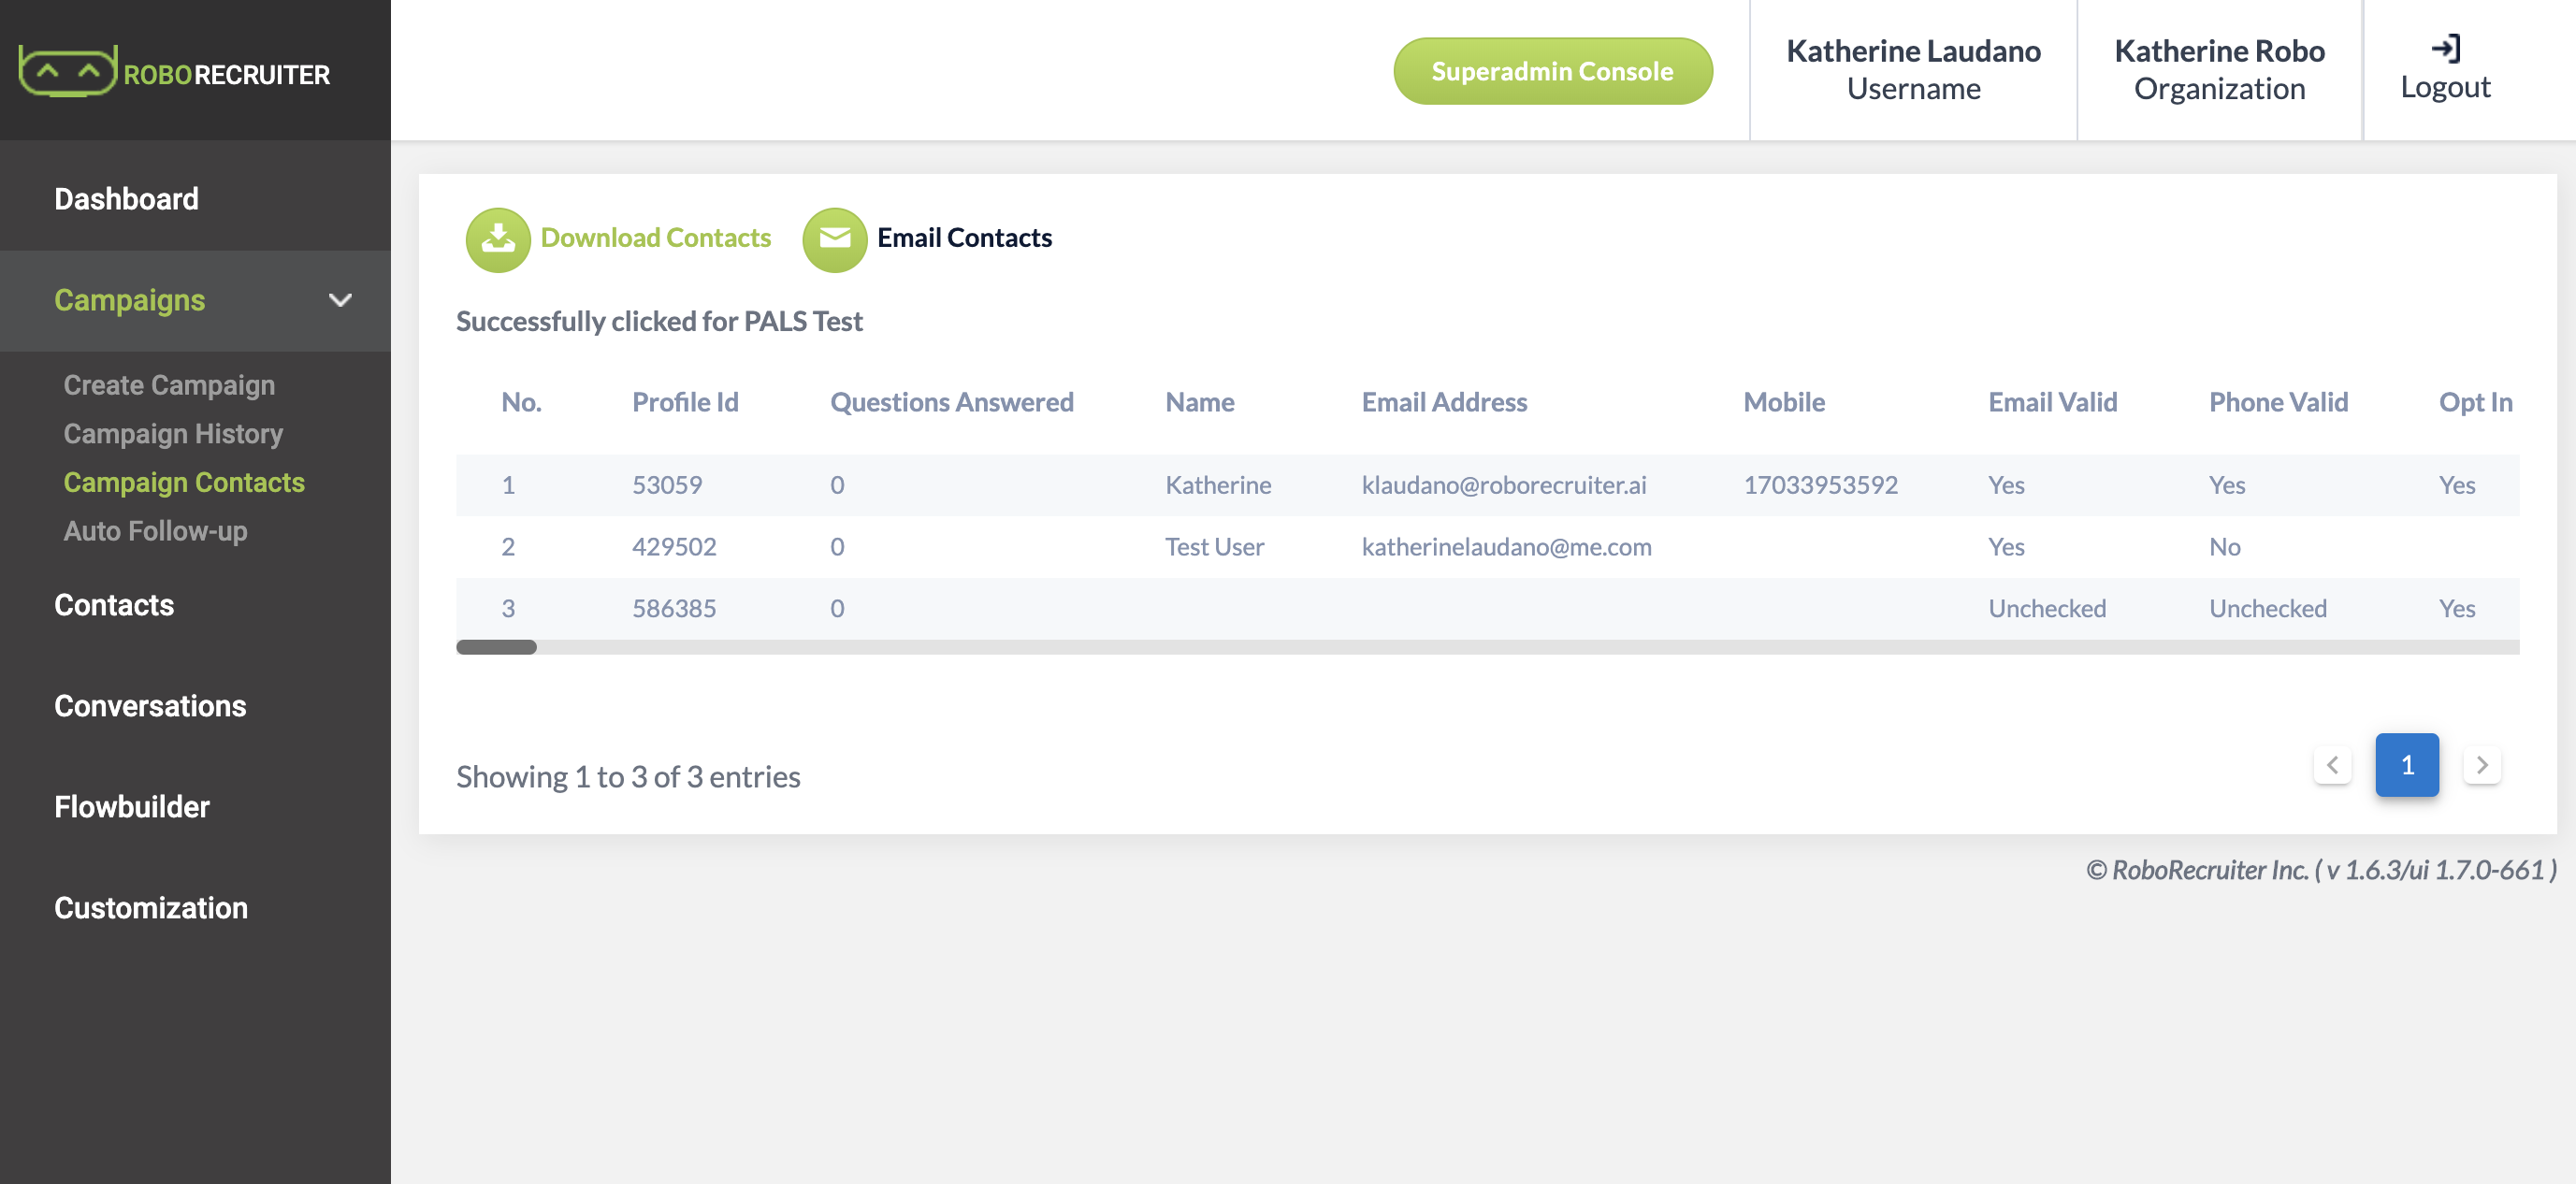
- Click into the bar of your choice to view a downloadable list of people in each category
- Click "Download Contacts" to receive a CSV file of your results